
If your whiteboard has an aluminum frame, before mounting it on the wall, you should fit the marker/eraser tray. See the image and the video for instructions on how to do it.
Alternatively, you can hire our whiteboard installation service.
Masonry walls (brick and concrete):
Whiteboards with an aluminum frame: Use the wall plugs (8.50 mm) and screws (4.5 x 50 mm) supplied with your whiteboard (they’re stored clipped to the back of the aluminum frame), one at each corner, lifting the plastic corner cap to access the mounting holes. For whiteboards from 120×200 upwards, once the board is fixed to the wall at all 4 corners, fit the additional supports along the board (2 at the top and 2 at the bottom). On some models, instead of additional supports, there are pre-drilled holes on the board itself for direct screw placement.
Whiteboards with a wooden frame: Use the wall plugs and screws supplied with your whiteboard to secure it to the holes already present along the frame profile.
Be sure to check the installation instructions supplied with your whiteboard.
Plasterboard walls (aka drywall or Pladur):
Use metal self-drilling/self-tapping wall plugs for this material (4.5 x 50 mm; not supplied with our whiteboards). Using a drill, make a small hole in the plasterboard, then screw the plug into it with a manual screwdriver rather than a power drill. Once the plugs are in place, mount the whiteboard with the supplied screws (4.5 x 50 mm), preferably tightening them with a manual screwdriver or a low-torque drill. The metal plug will offer some resistance until it opens internally under the screw’s force. For best results, you can lubricate the screw.
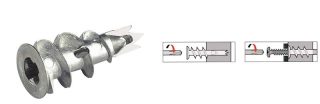
You can easily find plasterboard wall plugs at DIY stores, such as Leroy Merlin or others.